How to Cook Chicken Perfectly Every Time (Juicy, Tender & Never Dry)
I’ve served dry chicken to guests. More than once. The kind where everyone reaches for more water and says “it’s great!” a little too quickly. If you’re here because you keep ending up with chalky, flavorless chicken despite doing everything “right”, I get it. Learning how to cook chicken perfectly isn’t about one magic trick. It’s about understanding a few things that most recipes skip entirely.
Table of Contents :
Why Your Chicken Keeps Drying Out (And What’s Actually Happening)
Here’s the real answer: chicken dries out because the proteins contract and squeeze out moisture when they hit too much heat for too long. It’s not that you cooked it “a little too long.” Muscle fibers in chicken start tightening around 150°F and by 165°F, if you’ve been cooking hard the whole time, there’s not much juice left to save.
The other culprit? Cold chicken straight from the fridge into a hot pan. The outside overcooks before the inside catches up. You end up with a gray band of sadness around a barely-cooked center — so you keep cooking — and now it’s dry all the way through.
What I do now: I pull chicken out of the fridge 15–20 minutes before cooking. Not long enough to worry about food safety, but enough that it cooks more evenly. This one habit alone made a noticeable difference.
How to Cook Chicken Perfectly in a Pan (The Method That Actually Works)
This is where most home cooks go wrong in a very specific way: they move the chicken too early.
When you place chicken in a hot pan and it sticks — your instinct is to pry it off. Don’t. Chicken releases naturally when it’s ready to flip. If you’re fighting it, it’s not ready. Give it another 90 seconds. This is one of those sensory cues that sounds too simple until the first time you just wait and feel it lift cleanly.
Here’s the step-by-step method I use for boneless chicken breast:
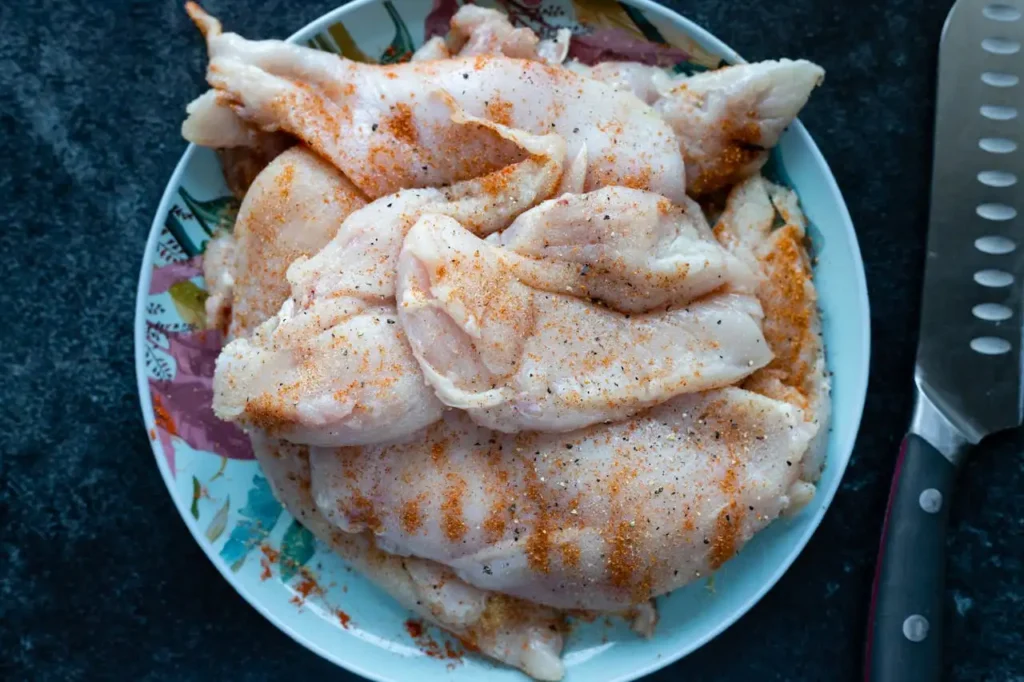
- Dry the chicken thoroughly with paper towels. Surface moisture = steaming, not searing. No browning, no flavor.
- Season generously — salt, pepper, garlic powder at minimum. Don’t be shy. Chicken needs more than you think.
- Heat your pan first, then add oil. Medium-high heat. The oil should shimmer before chicken goes in.
- Place chicken and don’t touch it for 5–6 minutes (for a standard breast). Press it down gently at first to ensure full contact with the pan.
- Flip once when it releases cleanly. Reduce heat to medium.
- Cook 4–5 more minutes, then check internal temp — 160–165°F. Pull it at 160°F and let carryover heat finish the job.
- Rest for 5 minutes before cutting. This is non-negotiable. Cutting early loses all the juice you just worked to keep.
This is how to cook chicken in a pan without ending up with something rubbery. The resting step is the one people skip most. Don’t.
The Salt Timing Secret Restaurants Actually Use
Here’s the insight I never see in basic chicken guides: when you salt matters as much as how much you salt.
Salt draws moisture out of meat initially — but if you salt at least 40 minutes before cooking (or overnight in the fridge), that moisture gets reabsorbed back in, now carrying the salt deeper into the muscle. This is a simplified version of dry brining, and it’s why restaurant chicken tastes seasoned all the way through, not just on the surface.
If you’re salting right before cooking, you’re hitting the worst window — moisture is pulled out but hasn’t had time to reabsorb. Your chicken surface is damp (bad for searing) and the inside is still bland.
Either salt well in advance, or salt right as it hits the pan. The 5–10 minute in-between zone is actually the least ideal time.
This is also part of how to make chicken tender and soft the way you get at good restaurants — it’s less about technique and more about patience before the cooking even starts.
How to Cook Chicken in the Oven Without Guessing
Oven chicken fails differently than pan chicken. The problem is usually uneven thickness — thin end dries out while the thick end finishes cooking.
The fix is simple and slightly violent: pound it. Place the breast in a zip-lock bag or between two sheets of plastic wrap and use a rolling pin (or a heavy pan) to even it out to about ¾ inch thickness. Even thickness = even cooking. It’s the single biggest upgrade for how to cook chicken breast perfectly in the oven.
For oven cooking:
- 400°F is the sweet spot for boneless breasts. Hot enough to get some color, not so hot it cooks the outside to leather before the inside finishes.
- Bone-in pieces need lower and slower — 375°F, longer time, and basting once or twice helps.
- Always use a thermometer. Always. Oven temperatures lie, chicken sizes vary, and “25 minutes” is a suggestion, not a guarantee.
Quick Fix Box:
Chicken already dry? Don’t throw it out. Slice thin, warm in broth or a pan sauce for 2–3 minutes. The added moisture won’t fully undo the damage but it rescues a meal.
You May Also Like these Chicken Recipes :
Grilled California Avocado Chicken
Honey Garlic Baked Chicken Drumsticks
A Story About Overcrowded Pans (That I Learned the Embarrassing Way)
I once made chicken stir-fry for six people. Doubled the recipe, same pan. What I got was basically boiled chicken swimming in its own steam, pale and sad, while my guests waited.
Overcrowding drops the pan temperature immediately. Instead of searing, you’re steaming. The chicken releases moisture, that moisture can’t evaporate fast enough, and you lose the browning reaction (the Maillard reaction — the same thing that makes bread crusts and seared steak taste incredible).
The rule: leave space. Cook in batches if you have to. Two properly seared batches will always beat one overcrowded pan. I now cook chicken pieces in a pan in two rounds and keep the first batch warm in a low oven. The extra 8 minutes is worth it every time.
How to Know When Chicken Is Done Without Cutting Into It Every 30 Seconds
Cutting into chicken to check is one of those habits that feels safe but actually causes the problem — every cut releases juice you don’t get back.
Get a meat thermometer. A cheap instant-read one works fine. The target is 165°F at the thickest part, not touching bone. But here’s what I do: I pull it at 160–162°F and tent it loosely with foil for 5 minutes. Carryover cooking brings it to 165°F without overshooting.
The other cue that actually works: the poke test. Press the chicken with a finger. Raw chicken feels like pressing the fleshy part of your palm with your hand fully relaxed. Cooked chicken feels firmer — like pressing that same spot with your hand in a loose fist. It takes practice but once you feel it, you don’t forget it.
FAQ
How long to cook chicken breast in a pan?
For a standard boneless breast (6–8 oz), about 5–6 minutes per side on medium-high heat. Use a thermometer to confirm 165°F — size varies too much to rely on time alone.
How do I make chicken soft and tender like restaurants?
Salt it early (at least 40 minutes ahead), don’t skip the rest after cooking, and avoid high heat the whole way through. Restaurants also pound breasts to even thickness so they cook evenly without drying out.
Why does my chicken turn out dry even when I follow the recipe?
Usually it’s one of three things: cooking from cold, cutting into it too early, or cooking past 165°F. A meat thermometer fixes all three by giving you real data instead of guesswork.
Can I cook chicken breast perfectly without a thermometer?
You can use the poke test (firmer = more done) and look for clear juices, but a thermometer is far more reliable. A basic instant-read one costs around $10 and removes all the guessing.
How do I cook chicken pieces evenly in a pan?
Make sure pieces are similar in size — pound or cut thicker ones down. Don’t overcrowd the pan, and start with a hot pan so you get a quick sear rather than a slow steam.
Once you understand why chicken dries out instead of just being told to “not overcook it,” everything clicks, and you stop crossing your fingers every time you put a breast in the pan.
Did you love this recipe?
Share it with your friends & family!
Leave a Comment