
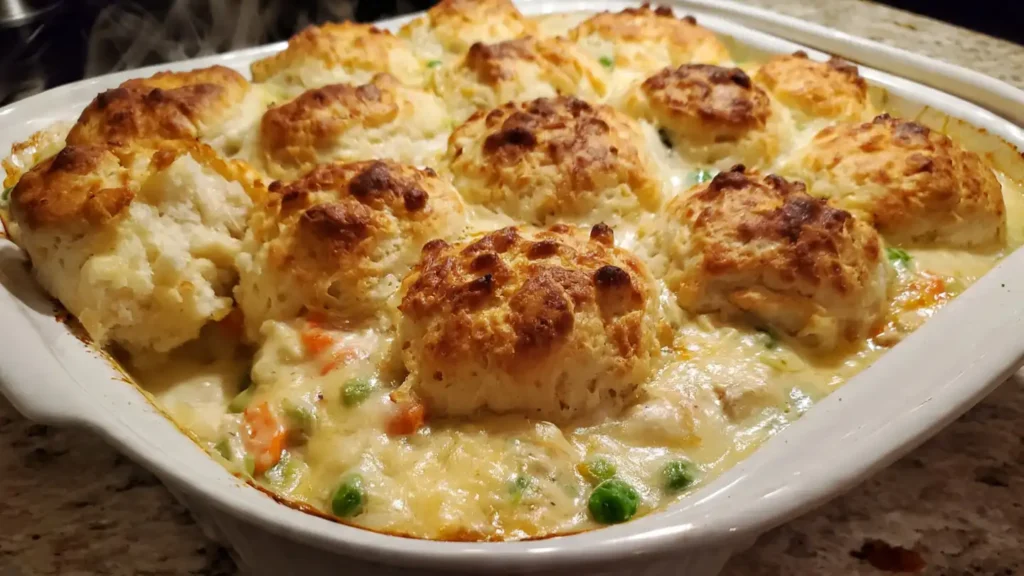
Cozy Chicken Pot Pie with Biscuits (Easy Family Dinner)
It’s no secret that I love a good chicken pot pie. And this Chicken Pot Pie recipe has been on heavy rotation at our dinner table for a couple of years now. My husband asks for it every time the temperature drops below 60. Our toddler eats whatever I put in front of him at this age (blissful, blissful stage). Our older one actually eats it too, as long as I do not mention the peas. (She does not know about the peas. We are keeping it that way lol.)
5 Reasons You’ll Love This Chicken Pot Pie
- Ready in About an Hour: Rotisserie chicken gets you from start to table in roughly 55 to 70 minutes, no marathon cooking session required.
- Biscuits Over Pie Crust: No rolling, no chilling, no crimping. A drop biscuit dough takes five minutes and is far more forgiving than pastry.
- Rich, Creamy Filling: Butter, broth, cream, and thyme. It tastes like something that simmered all afternoon. It didn’t.
- The Whole Family Eats It: My picky older kid picks around the visible peas but eats everything else, which in our house counts as a genuine win.
- The Filling Freezes Beautifully: Make a double batch and freeze half. Fresh biscuits later and you have dinner again with almost no effort.
Prep Time: 25 min
Cook Time: 45 min
Total Time: 70 min
Servings: 6
Difficulty: Easy
Cost: Budget-friendly

What Actually Matters Here
A few things get consistently glossed over in recipes for this dish, and they make a real difference.
The filling thickness is the whole game. The most common cause of gummy biscuit bottoms is a filling that was too thin when it went into the dish. Biscuits absorb liquid from below as they bake, which is part of why they’re so good in this context, but a runny filling makes them gummy all the way through instead of just soft on the underside and golden on top. Your filling should be thick enough that when you drag a spoon through it, the line holds for a second before closing. If it pours easily, keep cooking.
Always start with a hot filling. Recipes online give bake times ranging from 25 to 40 minutes and almost nobody explains why. It comes down to filling temperature. A hot filling goes into the oven and you just need the biscuits to cook through, which takes roughly 25 to 30 minutes. A cold or refrigerated filling needs the center to heat up first, which takes significantly longer. Transfer the filling to the baking dish hot, every single time.
Cook the roux all the way through. After adding the flour to the vegetables, stir constantly for a full one to two minutes before adding any liquid. If you rush this, you’ll taste raw flour in the finished sauce.
Equipment You’ll Need
- Wide Dutch oven or heavy stockpot (at least 4 quarts): You need the surface area for even sautéing and a smooth roux. A narrow saucepan won’t give you enough room and the sauce thickens unevenly.
- 9×13-inch casserole or baking dish: The right size for a biscuit-top version. Deeper pie dishes are for pastry-crust versions.
- Pastry cutter or your fingers: For working cold butter into the biscuit flour. Skip the food processor; it over-processes the butter and you lose the flaky pockets.
- Parchment-lined baking sheet: Slide this under the casserole in the oven. The filling WILL bubble over the edge and you do not want that on your oven floor. (I am saying this with full authority from experience.)
Ingredients
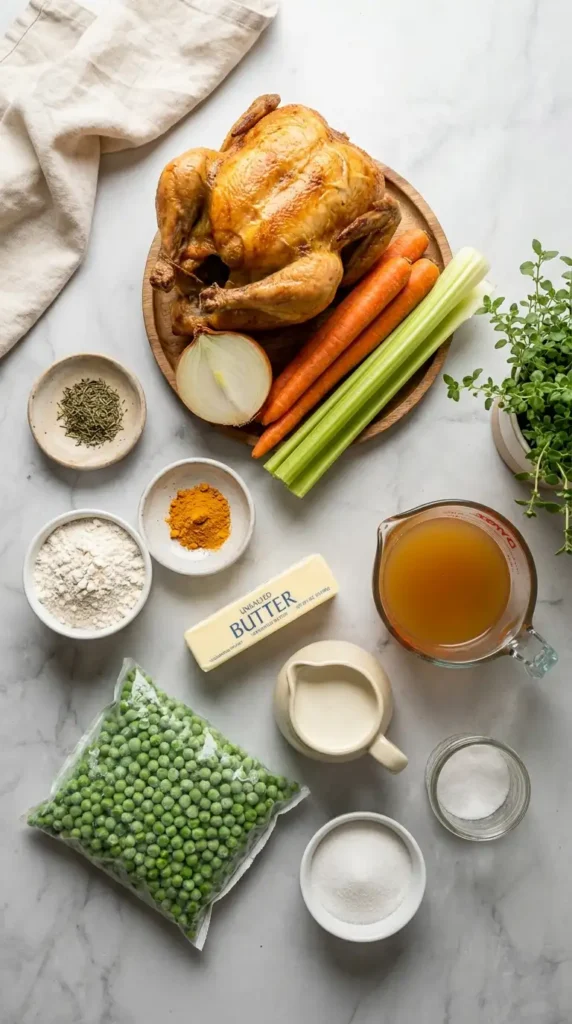
For the filling:
- 2½ to 3 cups cooked shredded chicken (rotisserie is what I always use, and it’s what Ree herself uses in her published recipes)
- 4 to 6 tablespoons unsalted butter
- 1 medium yellow onion, finely diced (about ⅔ cup)
- 2 to 3 medium carrots, finely diced (about ⅔ cup)
- 2 to 3 celery stalks, finely diced (about ⅔ cup)
- ⅓ to ½ cup all-purpose flour (use ½ cup for the biscuit-top version; you need the thicker filling)
- 2½ cups low-sodium chicken broth
- ½ to 1 cup heavy cream or half-and-half
- ¼ cup dry white wine, optional
- ½ to 1 cup frozen peas
- ¾ to 1 teaspoon dried thyme
- ⅛ teaspoon turmeric, optional (this is actually in Ree’s original filling and gives it a warm golden color worth keeping)
- Kosher salt and freshly ground black pepper, to taste
For the chicken:
I pick up a Kirkland rotisserie from Costco almost every week. It runs about $5 to $6 in-store and is consistently good. Don’t buy the pre-shredded rotisserie chicken in a pouch at a regular grocery store. It costs more and the texture is mushier.
For the drop biscuit topping:
- 2 cups all-purpose flour
- 1 to 2 teaspoons baking powder
- ½ teaspoon baking soda, optional (adds tenderness)
- 1 to 2 teaspoons granulated sugar
- ½ to 1 teaspoon kosher salt
- 6 to 8 tablespoons cold unsalted butter, cubed (cold, not softened, this part matters)
- 1 to 1¼ cups whole milk or buttermilk (buttermilk gives a more tender, slightly tangy biscuit)
Variations and Substitutions
- Turkey instead of chicken: This is a fantastic post-Thanksgiving swap. Same amounts, same method, the richness of roasted turkey works really well in the cream sauce.
- Canned biscuits: Pillsbury Grands work as a shortcut. Follow the package instructions for bake time and temperature since they’ll differ from the homemade version. You lose a little control over thickness and flavor, but it’s completely valid for a busy night.
- Puff pastry instead of biscuits: This is actually a separate Chicken Pot Pie with Biscuits recipe variant she’s made on the show. The result is flakier and lighter than biscuits, not a biscuit texture at all. Both are great in different ways.
- Half-and-half instead of heavy cream: The sauce comes out slightly thinner and less rich. Make sure your roux is on the thicker side before you add it.
- Gluten-free: A one-to-one GF flour swap works in both the roux and the biscuit dough. The biscuit texture will be slightly denser and the sauce slightly more gelatinous, but it holds together fine.
You May Also Like :
Classic Tuna Noodle Casserole (Easy, Creamy & Kid-Friendly)
Easy Chicken Zucchini Bake – A Simple One-Pan Dinner Everyone Loves
Instructions
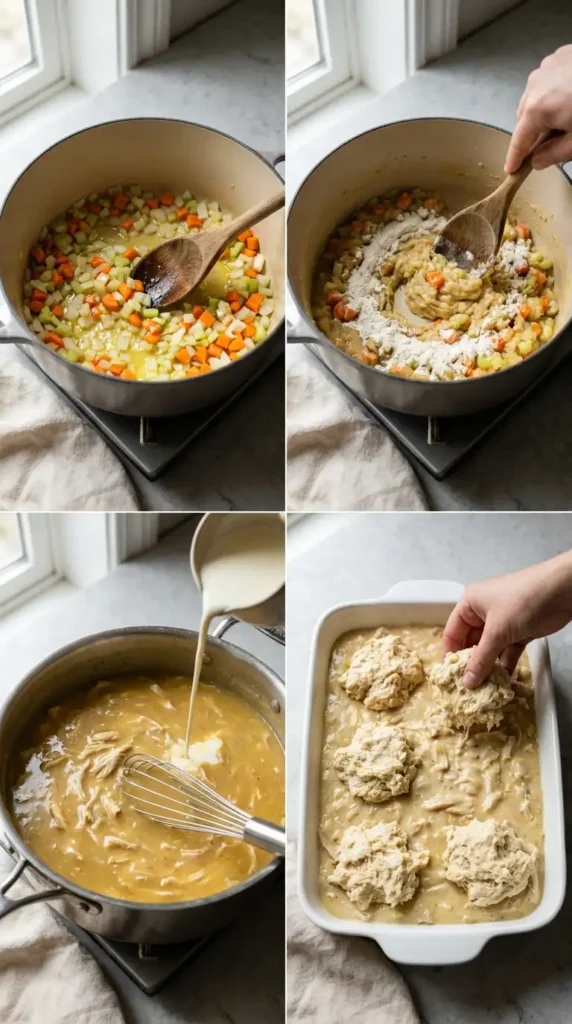
Step 1: Sauté the vegetables.
Melt the butter in your Dutch oven over medium heat. Add the diced onion, carrot, and celery. Cook for 5 to 7 minutes, stirring occasionally, until the vegetables are soft and the onion turns translucent. It should smell very good at this point.
Step 2: Build the roux.
Sprinkle the flour over the vegetables and stir constantly for 1 to 2 full minutes. The mixture will look thick and pasty, like a clumpy mess. That’s exactly correct. Cook until you cannot smell raw flour anymore. If you’re using white wine, add it now and stir until it’s mostly absorbed, about 2 minutes.
Step 3: Add the liquid and thicken the sauce.
Pour in the chicken broth in a thin, steady stream while whisking constantly to avoid lumps. Once incorporated, add the cream or half-and-half the same way. Cook over medium-low heat for about 5 minutes, stirring often, until the sauce is noticeably thick and coats the back of a spoon. Add the thyme, turmeric if using, salt, and pepper. Fold in the shredded chicken and frozen peas. Taste and adjust salt. Transfer the hot filling immediately to a greased 9×13-inch baking dish.
Step 4: Make the biscuit dough.
Preheat your oven to 400 to 425°F. Whisk together the flour, baking powder, baking soda (if using), sugar, and salt in a large bowl. Add the cold cubed butter and work it in with a pastry cutter or your fingers until the mixture looks like rough crumbs with some pea-sized butter bits still visible. Pour in the milk or buttermilk and stir just until a shaggy, slightly sticky dough forms. Don’t overmix. It should be wetter than pie dough and that’s fine.
Step 5: Top the filling and bake.
Drop pieces of biscuit dough over the hot filling, leaving small gaps between them (they expand in the oven and mostly fill in). Don’t press them flat. Let them stay tall so they can rise properly. Slide the casserole onto a parchment-lined baking sheet, then place in the oven.
Bake at 400 to 425°F for 25 to 40 minutes, until the biscuits are deep golden brown on top and the filling is actively bubbling up through the gaps. Because this recipe uses pre-cooked chicken, the main food safety priority is making sure the filling is fully heated through at the center. According to the USDA Food Safety and Inspection Service, all poultry should reach an internal temperature of 165°F before serving. If you’re ever unsure, check the center of the filling with a thermometer.
Step 6: Rest before serving.
Let the dish rest for 5 to 10 minutes after it comes out of the oven. This gives the filling a chance to settle so it scoops cleanly instead of running everywhere.
What Other Recipes Get Wrong
Almost no recipe explains why bake times for this dish range anywhere from 20 to 40 minutes online. It comes down entirely to filling temperature: hot filling means shorter oven time, cold or make-ahead filling means significantly longer. The second consistent gap is what “thick enough” actually means for a biscuit-top version. “Stir until thick” is not a useful benchmark here. If the filling is still pourable when the biscuits go on, they’ll steam from below and turn gummy instead of forming a proper golden crust. Give the filling a few extra minutes on the stovetop if you’re unsure. It’s worth it.
How to Store, Reheat, and Make Ahead
Fridge: Airtight container, 3 to 4 days. Keep the biscuits in a separate container from the filling if you can; they hold their texture much better that way.
Reheat the filling: Stovetop over medium-low heat with a splash of broth. Microwave also works; stir halfway through.
Reheat the biscuits: A 350°F oven for 5 to 7 minutes brings them back without making them rubbery. The microwave works in about 10 to 15 seconds, but they’ll be softer, not crispy.
Freezer: Freeze the filling only, without the biscuits, for up to 3 months. Let it cool completely first. Make fresh biscuit dough when you thaw and reheat. Biscuits just do not survive the freezer in good shape.
Make ahead: The filling can be made up to 2 days in advance and kept in the fridge. When ready to bake, reheat it on the stovetop until hot, then transfer to the baking dish, top with fresh biscuit dough, and bake. Remember that a warm-but-not-hot filling will push your bake time closer to 40 minutes.
What to Serve With It
This is already a complete meal in one dish, so I keep sides simple. A green salad with something acidic in the dressing (lemon vinaigrette or red wine vinegar) cuts through all the richness really nicely. If I’m feeding more people, a slice of warm crusty bread alongside works perfectly too. My older kid eats the bread and ignores everything else. My husband eats everything. The toddler distributes the biscuit across the floor. We call it a success and move on.

A Few Tips Worth Knowing
- Keep the butter cold for the biscuits. Cold butter creates steam pockets during baking and that’s what makes a biscuit flaky instead of dense. If your kitchen is warm and the butter starts to soften while you work, put the whole bowl in the freezer for 5 minutes before adding the milk.
- Season the filling more than feels right. Cream sauces absorb a lot of salt. Taste the filling before it goes into the dish. It should taste slightly over-seasoned on its own, because the biscuits on top balance it out.
- Don’t press the biscuits flat. Drop them gently and leave them tall. That’s how they rise properly.
- Baking sheet under the casserole dish. I know I already said this in the equipment section. I am saying it again because forgetting it is very easy and cleaning burned filling off an oven floor is genuinely not fun.
Nutrition Information
Per serving (based on 6 servings).
Calories: ~480 to 580 kcal
Carbohydrates: ~38 to 60g
Protein: ~25 to 33g
Fat: ~18 to 28g
Frequently Asked Questions
Can I use canned biscuits instead of making the dough?
Yes! Pillsbury Grands work well here. Follow the package instructions for bake time and temperature since they’ll differ from the homemade version. The flavor is a little different, but it’s completely fine for a weeknight when you just need dinner done.
Can I make chicken pot pie ahead of time?
Yes, with one important step. Make the filling up to 2 days ahead and refrigerate it without the biscuits. When you’re ready to bake, reheat the filling on the stovetop until hot, then top with fresh biscuit dough and bake. Plan for a bake time closer to 40 minutes if the filling isn’t starting fully hot.
How do I keep the biscuit topping from getting soggy?
Two things: make the filling genuinely thick before the biscuits go on (not pourable), and always put a hot filling into the oven rather than a cold one. If storing leftovers, keep the biscuits in a separate container from the filling.
Can I freeze chicken pot pie with biscuits?
Freeze the filling only, without the biscuits, for up to 3 months. When you thaw and reheat, make a fresh batch of biscuit dough. Biscuits don’t freeze and thaw well and they’ll come out gummy.
Is there a chicken pot pie soup version?
Absolutely. Skip the biscuit topping entirely and serve the filling as a thick soup in bowls with warm biscuits on the side. Ree has shared a deconstructed, soup-style version on her blog as well. It’s a little less structured but just as cozy, and it skips the baking step entirely.
If you make this and have a quick second to scroll down and leave a star rating, I would really appreciate it. It helps my little blog so much, and I always love hearing how it went for you. Thank you!
Cozy Chicken Pot Pie with Biscuits (Easy Family Dinner)
This Chicken Pot Pie recipe has a rich, creamy filling and golden drop biscuits on top. Easy comfort food the whole family will actually eat!
Ingredients 0/20
Instructions 0/6
Did you love this recipe?
Share it with your friends & family!


Leave a Comment